What is Google Authorship?
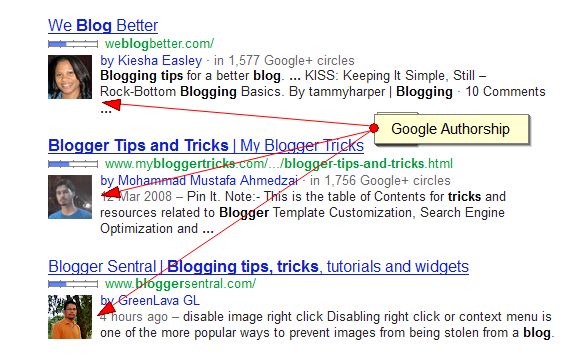
If you are a regular Google search engine user then you will already be experienced with Google authorship. You may find that in some of the search results a small picture of the author is seen next to the post. These posts are Google authorship verified and hence you are seeing the authors picture along with the post. This happens by linking the blog post with Google Plus profile. Now for an example see the image below.
I have searched in Google for "blogger tips and tricks" and obtain the above result. You can see the images of famous bloggers like Keisha Easely, Mohammad Mustafa Ahmedzai and GreenLava GL next to their blog page. This appears because their blogs are verified with Google authorship. Now you may be thinking that how to verify your blog for Google authorship? Don't worry I will help you to set up Google authorship for blog using Rel Author tag which will be explained later in this post.
How Google authorship helps in SEO?
Google authorship are always good for SEO. The CTR rate of your blog posts in Google search engine will increase when you set up Google authorship for your blog. According to Neil Patel the CTR of the blog can increases by 150% when you claim Google authorship for your blog. Also when the visitor clicks the image next to the post, he will enters into your Google Plus profile and may ended up in following you on Google Plus and which means that you are going to get a regular customer. "More by user option" brings all the contents which have written by the particular blogger and your CTR will become even high.How to set up and claim Google authorship?
There are two ways to claim your Google authorship. I will provide you the both ways to implement Google authorship for your blog.Option 1- Set up Google authorship using domain email address
If you don't have a domain email address skip this option and follow the next option.1. First step is to create a Google Plus Profile and to verify your email address. While creating Google Plus profile you must use the domain email address . For example if you have to connect your Google Plus profile to yourwebsite.com then your email address should be yourname@yourwebsite.com. When you create a Google account they will send you a mail to verify your email. Follow the steps in that mail for successful verification of your domain email address.
2. [Optional Step] Now you have to link your every post to Google Plus profile. You can easily do this by using about the author section of your blog. If you don't have an author box, it's time to add one now. Now add this tag in your author box
<a href="[Google Plus profile url]?rel=author">Google Plus</a>
Replace [Google Plus profile url] with your Google profile url. You can get it by clicking the profile button in Google Plus. If you don't wish to add author box for your blog you can manually link your post to Google Plus by manually adding the above tag after every post.
3. Now you have to create a byline containing you name like by [Google Plus profile name]. Replace this by [Google Plus profile name] your Google Plus name.
4. Third and final step is to submit your email address for Google authorship verification. Submit you email address in the space provided and Google will send back you a mail. Follow this and you are done.
Option 2- Set up Google authorship by linking content with Google Plus
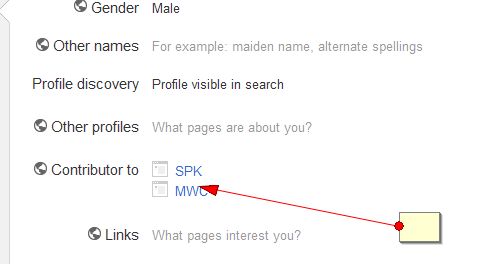
1. First you have to follow the step number 2 on option 1.2. Now go to your Google Plus and click profile. Now you can see the "contributor to" button.

Select that and add your blog link in the space provided.

Click save and after that click done editing. Now your blog has been successfully claimed Google authorship.

Check the Google authorship for your blog
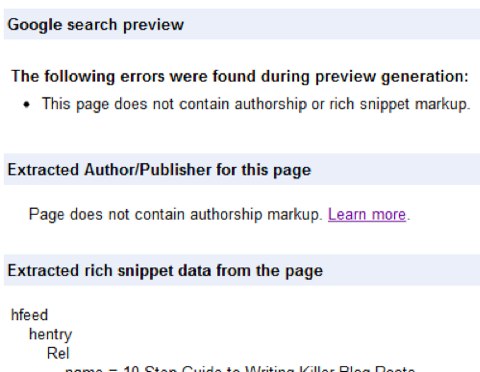
Google has provided snippet tool to check the Google authorship. All you have to do is visit snippet tool and enter any url of your blog. If you have successfully installed you will get the results like thisIf you have done anything wrong your results will be like this

How to verify your Guest post for Google authorship?
It will be a great advantage if you can use Google authorship for your guest posts. For this you have to add<a href="[Google Plus profile url]?rel=author">Google Plus</a> at the end of your post. Now go to your Google plus and do the step number 2 on option number 2. In the url field use your individual Guest post url.


January 29, 2013 at 12:50 PM
Where do we need to add this
Google Plus
in the edit html section ???